One year, I used a wonderful curriculum called "Galloping the Globe" with my younger children to give them an overview of world geography, and to whet their appetites for history, before we begin studying chronological world history the following year. I wanted some fun ways to make our journey special, and so I created individualised passports for each of my children. These passports feature a page for each country listed in the Galloping the Globe manual, and as we "visited" (studied) each country, I stamped the children's passports on the page for that country. However, these passports are not specific to GTG, and so could be used with any curriculum or unit studies, as you can add or subtract pages for countries to suit your own plans.
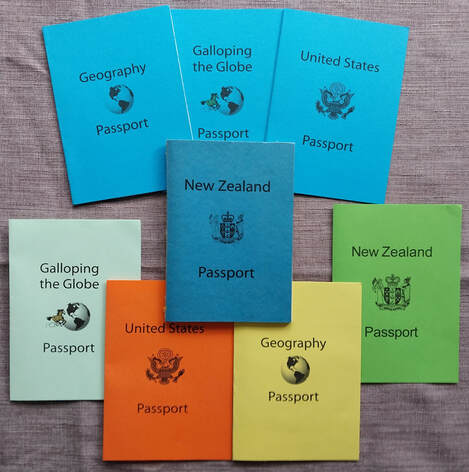
I live in New Zealand, so our passports had a NZ cover. Included in the e-files for making these passports are an alternative U.S cover, as well as a Galloping the Globe cover option, and a simple "Geography Passport" cover option too. If you are from another country, or would rather have a different cover, it is very simple to create your own, and I tell you how. I chose to print the covers on blue card, but you can make them whatever colour your wish.
You could, of course, create your own passport pages yourself from scratch. But, there are hours of work involved in doing so, and why re-invent the wheel? If you're a busy homeschooling mother like me, time is something you don't have much of! So, I'm thrilled to be able to provide you with all the pages for your own passport, at a very low cost, ready to print, along with all the instructions you need for how to do so. Of course, you'll still need to create your own personalised insert pages for each child, but I show you ours as an example.

Each passport has a personalised first page with the child's photo and details based upon what is found in a real passport - Issuing State, Passport #, Full name, Nationality, Date of Birth, Sex, Place of Birth, Date of Issue and Expiry Date. In this photo I've blanked out some personal details.
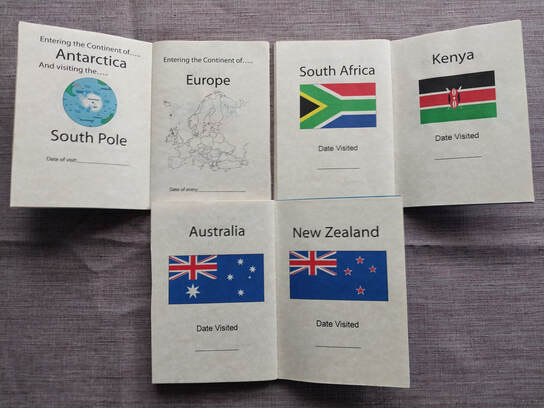
The rest of the pages are divided by the continental region they belong to. At the beginning of each continental section, there is a page saying "Entering the continent of...." along with the name, and an outline map of the continent. There is space to write or stamp in the date you begin exploring the continent.
The rest of the pages are one country per page, with the flag of the country and space to write the date visited or studied.
I print all inner pages on quality marbled paper and bound our passports are bound with heavy gold stitching, then sealed the covers with plastic covering. Information and instructions on how to assemble your passports are included in the download.
This is a list of the pages within the Geography Passports, in the order they appear when printed as per the templates, without any adjustment:
Personalised insert page
1. Entering the continent of Asia
2. China
3. South Korea
4. Japan
5. India
6. Israel
7. Visiting the Arctic Circle - North Pole
8. Entering the Continent of Antarctica - Visiting the South Pole
9. Entering the Continent of Europe
10. Russia
11. France
12. Italy
13. Germany
14. Holland (Netherlands)
15. Spain
16. United Kingdom
17. Entering the Continent of North America
18. Canada
19. United States
20. Mexico
21. Entering the Continent of South America
22. Brazil
23. Venezuela
24. Peru
25. Argentina
26. Blank
27. Entering the Continent of Africa
28. South Africa
39. Kenya
30. Morocco
31. Nigeria
32. Egypt
33. Entering the Continental Region of Oceania
34. Australia
35. New Zealand
The geography passports set is available as an electronic download, which includes instructions and all printables - including cover page options, country pages as outlined above, an example of a personalised insert for you to make your own. If you prefer to pay by internet banking, Contact Me.
NOTE: when you complete the check out, you will be automatically sent an email containing a download link, which expires after 8 attempts or 240 hours, whichever comes first. If you don't see the email, please check your spam folder. Remember to download and save the files right away. If you have any difficulties, email me. The files are in a compressed (zip) format - on some devices they will need to be extracted before opening. Usually, right click the downloaded file, and select "extract all" or "unzip".
